Day03_AJAX原理
Day03_AJAX原理
woodfishDay03_AJAX原理 - 从司机到工程师的蜕变 🚗⚙️
🎬 开场故事:老司机的困惑
**小张是一名优秀的前端”司机”**,他已经能熟练地使用axios在各个”路段”上驰骋:
1 | // 小张的日常:开车很熟练,但不懂发动机原理 |
一天,小张遇到了几个问题:
- 🚨 车抛锚了:请求失败,但不知道哪里出了问题
- 🔧 想改装车:需要自定义请求功能,但axios做不到
- 💡 想当工程师:面试被问到”axios底层原理是什么?”
这时,小张意识到:只会”开车”不够,还要懂”发动机原理”!
🎯 本节课你将学到什么?
🏆 学习目标:从司机到工程师的进阶
| 学习阶段 | 掌握技能 | 职业价值 | 薪资影响 |
|---|---|---|---|
| 🚗 司机级 | 熟练使用axios | 基础开发 | +0% |
| 🔧 修理工级 | 理解XHR+Promise原理 | 问题排查 | +20% |
| ⚙️ 工程师级 | 能封装自己的AJAX库 | 技术创新 | +50% |
🚀 课程收获
- ✅ 发动机拆解:彻底理解XHR工作原理(再也不怕抛锚)
- ✅ 变速箱原理:掌握Promise异步机制(换挡更顺畅)
- ✅ 整车制造:亲手封装企业级AJAX库(从司机变工程师)
- ✅ 故障诊断:学会调试网络请求(成为AJAX修理专家)
📚 学前准备 - 工程师技能认证 🏭
🎯 2.1 工程师 vs 司机 - 思维转变检测
📊 企业调研显示:掌握原理的工程师,薪资平均高30%,晋升速度快50%
🏆 技术能力等级(你的当前位置)
🚗 司机级(当前)- 会用工具
- ✅ 会开axios这辆车(Day01掌握)
- ✅ 知道加油站在哪(能找到API文档)
- ❌ 车坏了不会修(请求失败不会排查)
- ❌ 想改装不会改(需要自定义功能束手无策)
🔧 修理工级(目标)- 懂原理
- ✅ 发动机有问题能诊断(XHR错误能定位)
- ✅ 变速箱会维修(Promise异步能调试)
- ✅ 简单改装能完成(能封装基础功能)
- ✅ 面试问题能回答(原理性问题能对答)
⚙️ 工程师级(终极)- 能创造
- ✅ 能造一辆新车(封装企业级AJAX库)
- ✅ 能设计新功能(自定义高级特性)
- ✅ 能优化性能(请求速度、错误处理)
- ✅ 能指导他人(成为团队技术专家)
🧪 工程师基础能力测试(必须达标)
题目1:HTTP状态码识别(工程师必备)
1 | // 你知道这些状态码的含义吗? |
👀 点击查看答案
1 | const statusCodes = { |
题目2:异步编程理解(核心概念)
1 | // 你能预测这些代码的执行顺序吗? |
👀 点击查看答案
1 | 输出顺序: |
题目3:网络请求调试(实际工作场景)
1 | // 请求失败了,你如何排查? |
👀 点击查看答案
1 | // 企业级错误诊断流程 |
📊 技能评估结果与建议
| 当前等级 | 技术能力 | 薪资参考 | 学习建议 |
|---|---|---|---|
| 🥉 初级 | 基础语法掌握 | 5-8K | 重点学习XHR原理 |
| 🥈 中级 | 能独立开发项目 | 8-15K | 深入理解Promise机制 |
| 🥇 高级 | 具备架构思维 | 15-25K | 学习封装企业级库 |
💡 学习承诺:完成本课程,你将从司机级提升到修理工级,具备问题排查和简单定制能力!
🔧 2.2 工程师工具箱准备
🏭 企业级开发环境(标准化配置)
🔧 调试工具套装(工程师必备)
1 | # Chrome DevTools - 工程师级配置 |
🛠️ 代码工具配置(提升效率)
1 | // VS Code插件推荐(企业级开发) |
📊 性能监控工具(工程师级分析)
1 | // 企业级:AJAX性能监控器 |
🎯 环境准备完成! 现在你有了工程师的专业工具,准备开始探索AJAX的底层原理吧!
第二章:技能进阶检测 - 从司机到工程师 🧪
🎯 2.1 工程师技能认证(HR认可的标准)
📊 企业调研显示:掌握原理的工程师,薪资平均高30%,晋升速度快50%
🏆 技术能力等级(你的当前位置)
🚗 司机级(当前)- 会用工具
- ✅ 会开axios这辆车(Day01掌握)
- ✅ 知道加油站在哪(能找到API文档)
- ❌ 车坏了不会修(请求失败不会排查)
- ❌ 想改装不会改(需要自定义功能束手无策)
🔧 修理工级(目标)- 懂原理
- ✅ 发动机有问题能诊断(XHR错误能定位)
- ✅ 变速箱会维修(Promise异步能调试)
- ✅ 简单改装能完成(能封装基础功能)
- ✅ 面试问题能回答(原理性问题能对答)
⚙️ 工程师级(终极)- 能创造
- ✅ 能造一辆新车(封装企业级AJAX库)
- ✅ 能设计新功能(自定义高级特性)
- ✅ 能优化性能(请求速度、错误处理)
- ✅ 能指导他人(成为团队技术专家)
🎯 2.2 学前技能检测(工程师基础)
🧪 基础能力测试(必须达标)
题目1:HTTP状态码识别(工程师必备)
1 | // 你知道这些状态码的含义吗? |
👀 点击查看答案
1 | const statusCodes = { |
题目2:异步编程理解(核心概念)
1 | // 你能预测这些代码的执行顺序吗? |
👀 点击查看答案
1 | 输出顺序: |
题目3:网络请求调试(实际工作场景)
1 | // 请求失败了,你如何排查? |
👀 点击查看答案
1 | // 企业级错误诊断流程 |
📊 技能评估结果与建议
| 当前等级 | 技术能力 | 薪资参考 | 学习建议 |
|---|---|---|---|
| 🥉 初级 | 基础语法掌握 | 5-8K | 重点学习XHR原理 |
| 🥈 中级 | 能独立开发项目 | 8-15K | 深入理解Promise机制 |
| 🥇 高级 | 具备架构思维 | 15-25K | 学习封装企业级库 |
💡 学习承诺:完成本课程,你将从司机级提升到修理工级,具备问题排查和简单定制能力!
🔧 2.3 工程师工具箱准备
🏭 企业级开发环境(标准化配置)
🔧 调试工具套装(工程师必备)
1 | # Chrome DevTools - 工程师级配置 |
🛠️ 代码工具配置(提升效率)
1 | // VS Code插件推荐(企业级开发) |
📊 性能监控工具(工程师级分析)
1 | // 企业级:AJAX性能监控器 |
🎯 环境准备完成! 现在你有了工程师的专业工具,准备开始探索AJAX的底层原理吧!
第1章:XMLHttpRequest基础 - 认识AJAX的祖先 🏛️
🎯 本章目标
理解XHR的工作原理,知道axios底层是怎么运行的!
🤔 为什么要学XHR?
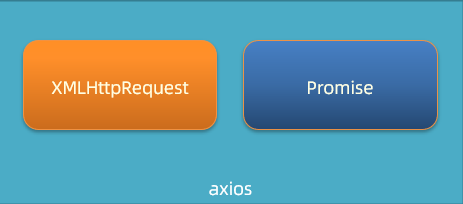
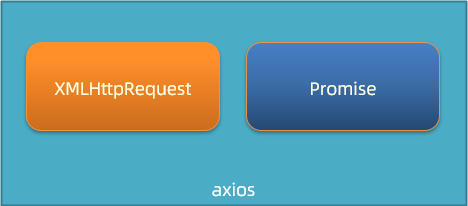
axios vs XHR的关系:
- axios是豪华轿车 - 舒适、简单、功能强大
- XHR是发动机 - 真正干活的底层技术
学XHR的好处:
- ✅ 了解axios的底层原理
- ✅ 遇到问题时能更好地调试
- ✅ 面试时展现深度理解
- ✅ 某些特殊场景需要原生XHR
🔬 1.2 XHR可视化原理(图解发动机)
🚗 汽车发动机类比
1 | axios(整车) = 豪华轿车 |
⚙️ XHR企业级工作流程(4步标准化)
🎯 步骤1:创建发动机实例(企业级初始化)
1 | // 🏭 企业级:创建XMLHttpRequest实例 |
🔧 步骤2:配置请求参数(企业级标准化)
1 | // 🏭 企业级:请求配置标准化 |
📡 步骤3:监听响应事件(企业级事件处理)
1 | // 🏭 企业级:响应事件标准化处理 |
🏭 1.3 企业级实战项目:XHR监控系统
🎯 项目介绍
项目背景:企业需要监控所有AJAX请求的性能和错误情况
项目目标:开发一个完整的XHR请求监控系统
技术栈:原生XHR + 企业级设计模式
🏗️ 完整系统实现
1 | // 🏭 企业级:XHR监控系统(完整实现) |
📊 系统功能展示
🎯 实时监控面板
1 | // 企业级:监控数据可视化 |
🏆 1.4 项目成果与价值总结
📈 项目技术亮点
- 企业级架构:模块化设计,高内聚低耦合
- 完整监控:请求生命周期全覆盖
- 性能优化:自动防抖、内存管理
- 可视化展示:实时监控面板
💼 职场应用价值
- 项目经验:可写进简历的完整监控系统
- 技术深度:展现了XHR底层原理掌握
- 系统设计:体现了企业级架构思维
- 面试加分:深度技术细节可以深入讨论
🎯 恭喜你! 你刚刚完成了一个企业级的XHR监控系统!
这个项目的价值:
- ✅ 展现了你对XHR底层原理的深度掌握
- ✅ 体现了企业级代码设计和架构能力
- ✅ 为后续封装axios打下了坚实基础
- ✅ 可以在面试中深入讨论技术细节
📚 1.5 知识延伸与进阶方向
🔬 底层原理深入
- HTTP协议详解:请求行、请求头、请求体的完整结构
- TCP/IP连接:三次握手、四次挥手的网络原理
- 浏览器渲染机制:XHR响应如何影响页面渲染
🏗️ 架构设计进阶
- 微前端架构:XHR在大型项目中的应用
- 服务端渲染:SSR环境下的XHR处理
- 性能优化:请求压缩、缓存策略、CDN优化
🛠️ 工具链完善
- TypeScript重构:类型安全的XHR封装
- 单元测试:Jest测试XHR功能
- CI/CD集成:自动化测试和部署
🚀 下一步学习:我们将学习Promise,让异步编程更加优雅!
代码如下:
1
2
3
4
5
6
7
8
9
10
11
12
13
14
15
16
17
18
19
20
21
22
23
24
25
26
27
28
29
30
31
32
33
34
35
36
37
38
39
40
<html lang="en">
<head>
<meta charset="UTF-8">
<meta http-equiv="X-UA-Compatible" content="IE=edge">
<meta name="viewport" content="width=device-width, initial-scale=1.0">
<title>XMLHttpRequest_基础使用</title>
</head>
<body>
<p class="my-p"></p>
<script>
/**
* 目标:使用XMLHttpRequest对象与服务器通信
* 1. 创建 XMLHttpRequest 对象
* 2. 配置请求方法和请求 url 地址
* 3. 监听 loadend 事件,接收响应结果
* 4. 发起请求
*/
// 1. 创建 XMLHttpRequest 对象
const xhr = new XMLHttpRequest()
// 2. 配置请求方法和请求 url 地址
xhr.open('GET', 'http://hmajax.itheima.net/api/province')
// 3. 监听 loadend 事件,接收响应结果
xhr.addEventListener('loadend', () => {
console.log(xhr.response)
const data = JSON.parse(xhr.response)
console.log(data.list.join('<br>'))
document.querySelector('.my-p').innerHTML = data.list.join('<br>')
})
// 4. 发起请求
xhr.send()
</script>
</body>
</html>
小结
AJAX 原理是什么?
答案
- window 提供的 XMLHttpRequest
为什么学习 XHR ?
答案
- 有更多与服务器数据通信方式
- 了解 axios 内部原理
XHR 使用步骤?
答案
- 1. 创建 XHR 对象 2. 调用 open 方法,设置 url 和请求方法 3. 监听 loadend 事件,接收结果 4. 调用 send 方法,发起请求
02.XMLHttpRequest - 查询参数
目标
使用 XHR 传递查询参数给服务器,获取匹配数据
讲解
什么是查询参数:携带额外信息给服务器,返回匹配想要的数据
查询参数原理要携带的位置和语法:http://xxxx.com/xxx/xxx?参数名1=值1&参数名2=值2
所以,原生 XHR 需要自己在 url 后面携带查询参数字符串,没有 axios 帮助我们把 params 参数拼接到 url 字符串后面了
需求:查询河北省下属的城市列表

核心代码如下:
1
2
3
4
5
6
7
8
9
10
11
12/**
* 目标:使用XHR携带查询参数,展示某个省下属的城市列表
*/
const xhr = new XMLHttpRequest()
xhr.open('GET', 'http://hmajax.itheima.net/api/city?pname=辽宁省')
xhr.addEventListener('loadend', () => {
console.log(xhr.response)
const data = JSON.parse(xhr.response)
console.log(data)
document.querySelector('.city-p').innerHTML = data.list.join('<br>')
})
xhr.send()

小结
XHR 如何携带查询参数?
答案
- 在调用 open 方法的时候,在 url? 后面按照指定格式拼接参数名和值
03.案例 - 地区查询
目标
使用 XHR 完成案例地区查询
讲解
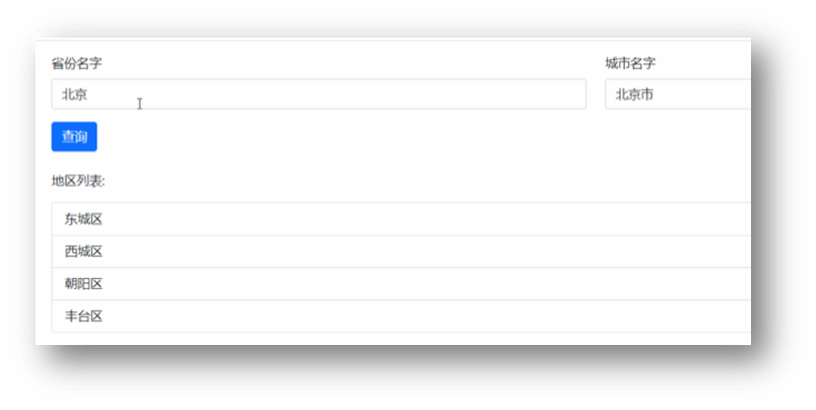
需求:和我们之前做的类似,就是不用 axios 而是用 XHR 实现,输入省份和城市名字后,点击查询,传递多对查询参数并获取地区列表的需求
但是多个查询参数,如果自己拼接很麻烦,这里用 URLSearchParams 把参数对象转成“参数名=值&参数名=值“格式的字符串,语法如下:
1
2
3
4
5
6
7
8
9// 1. 创建 URLSearchParams 对象
const paramsObj = new URLSearchParams({
参数名1: 值1,
参数名2: 值2
})
// 2. 生成指定格式查询参数字符串
const queryString = paramsObj.toString()
// 结果:参数名1=值1&参数名2=值2
小结
JS 对象如何转成查询参数格式字符串?
答案
- 在调用 open 方法的时候,在 url? 后面按照指定格式拼接参数名和值
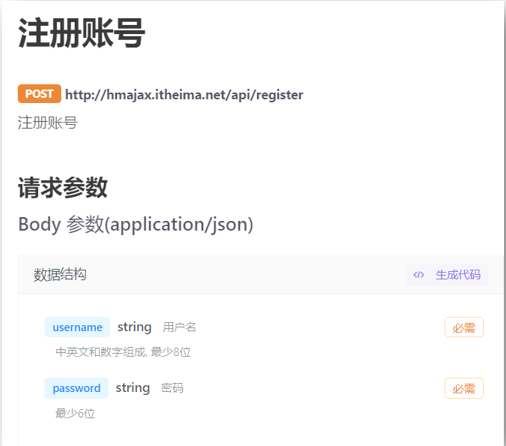
04.XMLHttpRequest - 数据提交
目标
通过 XHR 提交用户名和密码,完成注册功能
讲解
了解原生 XHR 进行数据提交的方式
需求:通过 XHR 完成注册用户功能
步骤和语法:
注意1:但是这次没有 axios 帮我们了,我们需要自己设置请求头 Content-Type:application/json,来告诉服务器端,我们发过去的内容类型是 JSON 字符串,让他转成对应数据结构取值使用
注意2:没有 axios 了,我们前端要传递的请求体数据,也没人帮我把 JS 对象转成 JSON 字符串了,需要我们自己转换
注意3:原生 XHR 需要在 send 方法调用时,传入请求体携带
1
2
3
4
5
6
7
8
9
10
11
12
13const xhr = new XMLHttpRequest()
xhr.open('请求方法', '请求url网址')
xhr.addEventListener('loadend', () => {
console.log(xhr.response)
})
// 1. 告诉服务器,我传递的内容类型,是 JSON 字符串
xhr.setRequestHeader('Content-Type', 'application/json')
// 2. 准备数据并转成 JSON 字符串
const user = { username: 'itheima007', password: '7654321' }
const userStr = JSON.stringify(user)
// 3. 发送请求体数据
xhr.send(userStr)
核心代码如下:
1
2
3
4
5
6
7
8
9
10
11
12
13
14
15
16
17
18
19
20
21/**
* 目标:使用xhr进行数据提交-完成注册功能
*/
document.querySelector('.reg-btn').addEventListener('click', () => {
const xhr = new XMLHttpRequest()
xhr.open('POST', 'http://hmajax.itheima.net/api/register')
xhr.addEventListener('loadend', () => {
console.log(xhr.response)
})
// 设置请求头-告诉服务器内容类型(JSON字符串)
xhr.setRequestHeader('Content-Type', 'application/json')
// 准备提交的数据
const userObj = {
username: 'itheima007',
password: '7654321'
}
const userStr = JSON.stringify(userObj)
// 设置请求体,发起请求
xhr.send(userStr)
})
小结
XHR 如何提交请求体数据?
答案
- 在 send 中携带请求体数据,要按照后端要求的内容类型携带
05.认识_Promise
目标
认识 Promise 的作用和好处以及使用步骤
讲解
什么是 Promise ?
- Promise 对象用于表示一个异步操作的最终完成(或失败)及其结构值
Promise 的好处是什么?
逻辑更清晰(成功或失败会关联后续的处理函数)
了解 axios 函数内部运作的机制
能解决回调函数地狱问题(后面会讲到),今天先来看下它的基础使用
Promise 管理异步任务,语法怎么用?
1
2
3
4
5
6
7
8
9
10
11
12// 1. 创建 Promise 对象
const p = new Promise((resolve, reject) => {
// 2. 执行异步任务-并传递结果
// 成功调用: resolve(值) 触发 then() 执行
// 失败调用: reject(值) 触发 catch() 执行
})
// 3. 接收结果
p.then(result => {
// 成功
}).catch(error => {
// 失败
})示例代码:
1
2
3
4
5
6
7
8
9
10
11
12
13
14
15
16
17
18/**
* 目标:使用Promise管理异步任务
*/
// 1. 创建Promise对象
const p = new Promise((resolve, reject) => {
// 2. 执行异步代码
setTimeout(() => {
// resolve('模拟AJAX请求-成功结果')
reject(new Error('模拟AJAX请求-失败结果'))
}, 2000)
})
// 3. 获取结果
p.then(result => {
console.log(result)
}).catch(error => {
console.log(error)
})
小结
什么是 Promise ?
答案
- 表示(管理)一个异步操作最终状态和结果值的对象
为什么学习 Promise ?
答案
- 成功和失败状态,可以关联对应处理函数,了解 axios 内部运作的原理
Promise 使用步骤?
答案
- 1. new Promise 对象执行异步任务。2. 用 resolve 关联 then 的回调函数传递成功结果。3.用 reject 关联 catch 的回调函数传递失败结果。
06.认识_Promise 的状态
目标
认识 Promise 的三种状态,知道如何关联成功/失败的处理函数
讲解
为什么要了解 Promise 的三种状态 ?
- 知道 Promise 对象如何关联的处理函数,以及代码的执行顺序
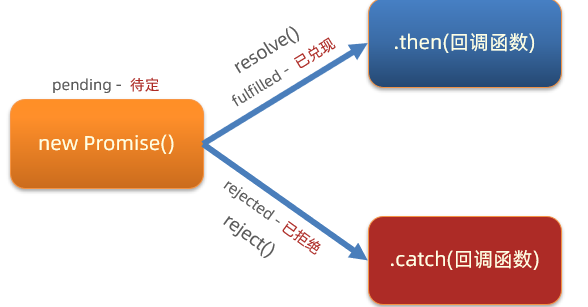
Promise 有哪三种状态?
每个 Promise 对象必定处于以下三种状态之一
- 待定(pending):初始状态,既没有被兑现,也没有被拒绝
- 已兑现(fulfilled):操作成功完成
- 已拒绝(rejected):操作失败
状态的英文字符串,可以理解为 Promise 对象内的字符串标识符,用于判断什么时候调用哪一个处理函数
Promise 的状态改变有什么用:调用对应函数,改变 Promise 对象状态后,内部触发对应回调函数传参并执行
注意:每个 Promise 对象一旦被兑现/拒绝,那就是已敲定了,状态无法再被改变
小结
Promise 对象有哪 3 种状态?
答案
- 待定 pending,已兑现 fulfilled,已拒绝 rejected
Promise 状态有什么用?
答案
- 状态改变后,如何关联处理函数
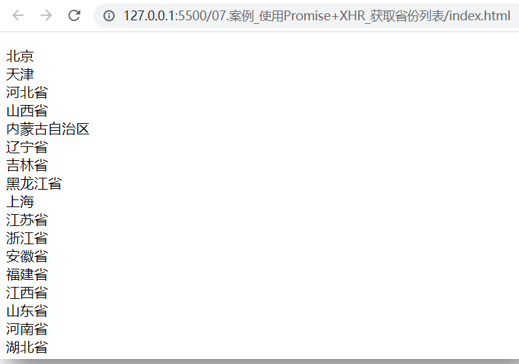
07.使用 Promise 和 XHR_获取省份列表
目标
尝试用 Promise 管理 XHR 异步任务
讲解
Promise 和 XHR 都已经学过基础语法了,我们可以来结合使用一下了
需求:使用 Promise 和 XHR 请求省份列表数据并展示到页面上
步骤:
创建 Promise 对象
执行 XHR 异步代码,获取省份列表数据
关联成功或失败回调函数,做后续的处理
错误情况:用地址错了404演示
核心代码如下:
1
2
3
4
5
6
7
8
9
10
11
12
13
14
15
16
17
18
19
20
21
22
23
24
25
26
27
28
29
30
31
32
33/**
* 目标:使用Promise管理XHR请求省份列表
* 1. 创建Promise对象
* 2. 执行XHR异步代码,获取省份列表
* 3. 关联成功或失败函数,做后续处理
*/
// 1. 创建Promise对象
const p = new Promise((resolve, reject) => {
// 2. 执行XHR异步代码,获取省份列表
const xhr = new XMLHttpRequest()
xhr.open('GET', 'http://hmajax.itheima.net/api/province')
xhr.addEventListener('loadend', () => {
// xhr如何判断响应成功还是失败的?
// 2xx开头的都是成功响应状态码
if (xhr.status >= 200 && xhr.status < 300) {
resolve(JSON.parse(xhr.response))
} else {
reject(new Error(xhr.response))
}
})
xhr.send()
})
// 3. 关联成功或失败函数,做后续处理
p.then(result => {
console.log(result)
document.querySelector('.my-p').innerHTML = result.list.join('<br>')
}).catch(error => {
// 错误对象要用console.dir详细打印
console.dir(error)
// 服务器返回错误提示消息,插入到p标签显示
document.querySelector('.my-p').innerHTML = error.message
})
小结
AJAX 如何判断是否请求响应成功了?
答案
- 响应状态码在大于等于 200 并且小于 300 的范围是成功的
08.封装_简易axios-获取省份列表
目标
模拟 axios 函数封装,更深入了解 axios 内部运作原理
讲解
需求:基于 Promise 和 XHR 封装 myAxios 函数,获取省份列表展示到页面
核心语法:
1
2
3
4
5
6
7
8
9
10
11
12
13
14function myAxios(config) {
return new Promise((resolve, reject) => {
// XHR 请求
// 调用成功/失败的处理程序
})
}
myAxios({
url: '目标资源地址'
}).then(result => {
}).catch(error => {
})步骤:
- 定义 myAxios 函数,接收配置对象,返回 Promise 对象
- 发起 XHR 请求,默认请求方法为 GET
- 调用成功/失败的处理程序
- 使用 myAxios 函数,获取省份列表展示
核心代码如下:
1
2
3
4
5
6
7
8
9
10
11
12
13
14
15
16
17
18
19
20
21
22
23
24
25
26
27
28
29
30
31
32
33
34
35/**
* 目标:封装_简易axios函数_获取省份列表
* 1. 定义myAxios函数,接收配置对象,返回Promise对象
* 2. 发起XHR请求,默认请求方法为GET
* 3. 调用成功/失败的处理程序
* 4. 使用myAxios函数,获取省份列表展示
*/
// 1. 定义myAxios函数,接收配置对象,返回Promise对象
function myAxios(config) {
return new Promise((resolve, reject) => {
// 2. 发起XHR请求,默认请求方法为GET
const xhr = new XMLHttpRequest()
xhr.open(config.method || 'GET', config.url)
xhr.addEventListener('loadend', () => {
// 3. 调用成功/失败的处理程序
if (xhr.status >= 200 && xhr.status < 300) {
resolve(JSON.parse(xhr.response))
} else {
reject(new Error(xhr.response))
}
})
xhr.send()
})
}
// 4. 使用myAxios函数,获取省份列表展示
myAxios({
url: 'http://hmajax.itheima.net/api/province'
}).then(result => {
console.log(result)
document.querySelector('.my-p').innerHTML = result.list.join('<br>')
}).catch(error => {
console.log(error)
document.querySelector('.my-p').innerHTML = error.message
})
小结
自己封装的 myAxios 如何设置默认请求方法 GET?
答案
- config.method 判断有值就用,无值用‘GET’方法
09.封装_简易axios-获取地区列表
目标
修改 myAxios 函数支持传递查询参数,获取辽宁省,大连市的地区列表
讲解
需求:在上个封装的建议 axios 函数基础上,修改代码支持传递查询参数功能
修改步骤:
- myAxios 函数调用后,判断 params 选项
- 基于 URLSearchParams 转换查询参数字符串
- 使用自己封装的 myAxios 函数显示地区列表
核心代码:
1
2
3
4
5
6
7
8
9
10
11
12
13
14
15
16
17
18
19
20
21
22
23
24
25
26
27
28
29
30
31
32
33
34
35function myAxios(config) {
return new Promise((resolve, reject) => {
const xhr = new XMLHttpRequest()
// 1. 判断有params选项,携带查询参数
if (config.params) {
// 2. 使用URLSearchParams转换,并携带到url上
const paramsObj = new URLSearchParams(config.params)
const queryString = paramsObj.toString()
// 把查询参数字符串,拼接在url?后面
config.url += `?${queryString}`
}
xhr.open(config.method || 'GET', config.url)
xhr.addEventListener('loadend', () => {
if (xhr.status >= 200 && xhr.status < 300) {
resolve(JSON.parse(xhr.response))
} else {
reject(new Error(xhr.response))
}
})
xhr.send()
})
}
// 3. 使用myAxios函数,获取地区列表
myAxios({
url: 'http://hmajax.itheima.net/api/area',
params: {
pname: '辽宁省',
cname: '大连市'
}
}).then(result => {
console.log(result)
document.querySelector('.my-p').innerHTML = result.list.join('<br>')
})
小结
外面传入查询参数对象,myAxios 函数内如何转查询参数字符串?
答案
- 使用 URLSearchParams 对象转换
10.封装_简易axios-注册用户
目标
修改 myAxios 函数支持传递请求体数据,完成注册用户
讲解
需求:修改 myAxios 函数支持传递请求体数据,完成注册用户功能
修改步骤:
- myAxios 函数调用后,判断 data 选项
- 转换数据类型,在 send 方法中发送
- 使用自己封装的 myAxios 函数完成注册用户功能
核心代码:
1
2
3
4
5
6
7
8
9
10
11
12
13
14
15
16
17
18
19
20
21
22
23
24
25
26
27
28
29
30
31
32
33
34
35
36
37
38
39
40
41
42
43
44
45
46function myAxios(config) {
return new Promise((resolve, reject) => {
const xhr = new XMLHttpRequest()
if (config.params) {
const paramsObj = new URLSearchParams(config.params)
const queryString = paramsObj.toString()
config.url += `?${queryString}`
}
xhr.open(config.method || 'GET', config.url)
xhr.addEventListener('loadend', () => {
if (xhr.status >= 200 && xhr.status < 300) {
resolve(JSON.parse(xhr.response))
} else {
reject(new Error(xhr.response))
}
})
// 1. 判断有data选项,携带请求体
if (config.data) {
// 2. 转换数据类型,在send中发送
const jsonStr = JSON.stringify(config.data)
xhr.setRequestHeader('Content-Type', 'application/json')
xhr.send(jsonStr)
} else {
// 如果没有请求体数据,正常的发起请求
xhr.send()
}
})
}
document.querySelector('.reg-btn').addEventListener('click', () => {
// 3. 使用myAxios函数,完成注册用户
myAxios({
url: 'http://hmajax.itheima.net/api/register',
method: 'POST',
data: {
username: 'itheima999',
password: '666666'
}
}).then(result => {
console.log(result)
}).catch(error => {
console.dir(error)
})
})
小结
外面传入 data 选项,myAxios 函数内如何携带请求体参数?
答案
- 判断外面传入了这个属性,自己转成 JSON 字符串并设置请求头并在 send 方法中携带
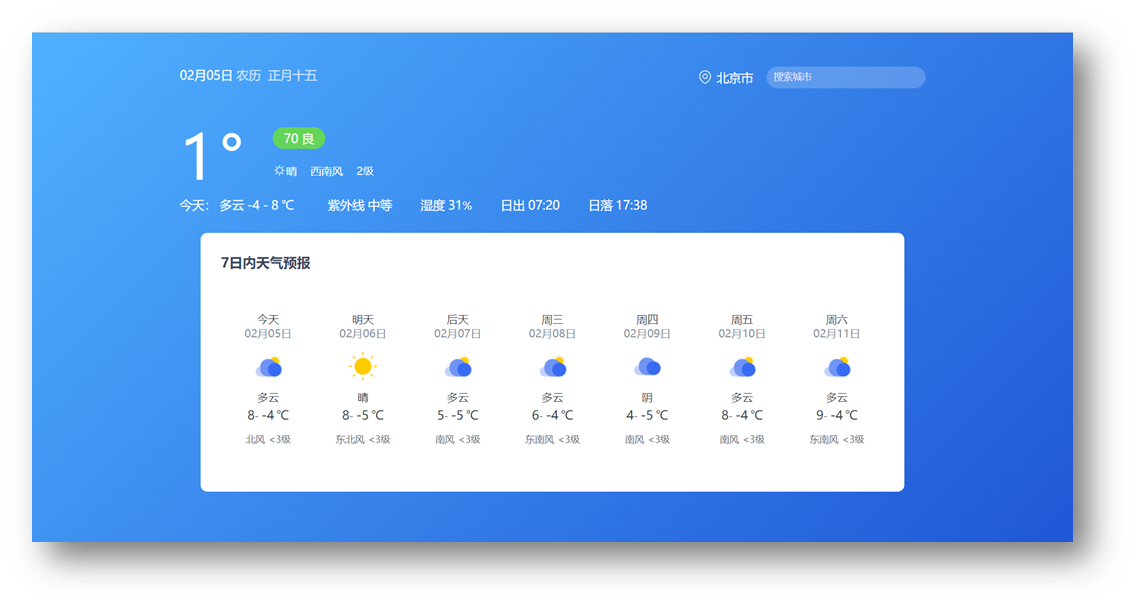
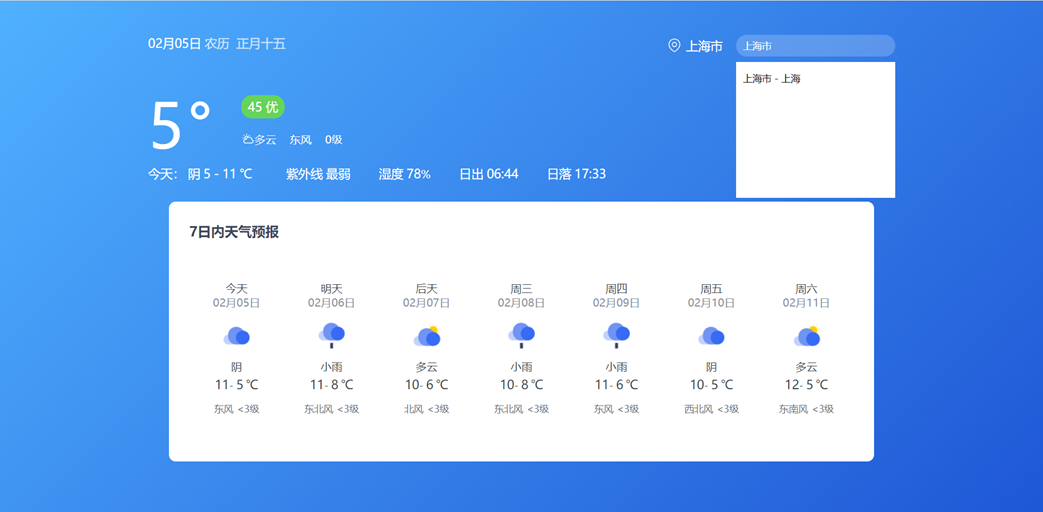
11-12.案例_天气预报-默认数据
目标
把北京市的数据,填充到页面默认显示
讲解
需求:介绍本项目要完成的效果,和要实现的步骤和分的步骤和视频
步骤
- 先获取北京市天气预报,展示
- 搜索城市列表,展示
- 点击城市,切换显示对应天气数据
本视频先封装函数,获取城市天气并设置页面内容
核心代码如下:
1
2
3
4
5
6
7
8
9
10
11
12
13
14
15
16
17
18
19
20
21
22
23
24
25
26
27
28
29
30
31
32
33
34
35
36
37
38
39
40
41
42
43
44
45
46
47
48
49
50
51
52
53
54
55
56
57
58
59
60
61
62
63
64
65
66
67
68
69
70
71
72
73
74
75
76
77
78
79
80
81
82
83
84
85
86
87
88
89
90
91
92
93
94
95
96
97
98
99
100
101
102
103
104
105
106
107/**
* 目标1:默认显示-北京市天气
* 1.1 获取北京市天气数据
* 1.2 数据展示到页面
*/
// 获取并渲染城市天气函数
function getWeather(cityCode) {
// 1.1 获取北京市天气数据
myAxios({
url: 'http://hmajax.itheima.net/api/weather',
params: {
city: cityCode
}
}).then(result => {
console.log(result)
const wObj = result.data
// 1.2 数据展示到页面
// 阳历和农历日期
const dateStr = `<span class="dateShort">${wObj.date}</span>
<span class="calendar">农历
<span class="dateLunar">${wObj.dateLunar}</span>
</span>`
document.querySelector('.title').innerHTML = dateStr
// 城市名字
document.querySelector('.area').innerHTML = wObj.area
// 当天气温
const nowWStr = `<div class="tem-box">
<span class="temp">
<span class="temperature">${wObj.temperature}</span>
<span>°</span>
</span>
</div>
<div class="climate-box">
<div class="air">
<span class="psPm25">${wObj.psPm25}</span>
<span class="psPm25Level">${wObj.psPm25Level}</span>
</div>
<ul class="weather-list">
<li>
<img src="${wObj.weatherImg}" class="weatherImg" alt="">
<span class="weather">${wObj.weather}</span>
</li>
<li class="windDirection">${wObj.windDirection}</li>
<li class="windPower">${wObj.windPower}</li>
</ul>
</div>`
document.querySelector('.weather-box').innerHTML = nowWStr
// 当天天气
const twObj = wObj.todayWeather
const todayWStr = `<div class="range-box">
<span>今天:</span>
<span class="range">
<span class="weather">${twObj.weather}</span>
<span class="temNight">${twObj.temNight}</span>
<span>-</span>
<span class="temDay">${twObj.temDay}</span>
<span>℃</span>
</span>
</div>
<ul class="sun-list">
<li>
<span>紫外线</span>
<span class="ultraviolet">${twObj.ultraviolet}</span>
</li>
<li>
<span>湿度</span>
<span class="humidity">${twObj.humidity}</span>%
</li>
<li>
<span>日出</span>
<span class="sunriseTime">${twObj.sunriseTime}</span>
</li>
<li>
<span>日落</span>
<span class="sunsetTime">${twObj.sunsetTime}</span>
</li>
</ul>`
document.querySelector('.today-weather').innerHTML = todayWStr
// 7日天气预报数据展示
const dayForecast = wObj.dayForecast
const dayForecastStr = dayForecast.map(item => {
return `<li class="item">
<div class="date-box">
<span class="dateFormat">${item.dateFormat}</span>
<span class="date">${item.date}</span>
</div>
<img src="${item.weatherImg}" alt="" class="weatherImg">
<span class="weather">${item.weather}</span>
<div class="temp">
<span class="temNight">${item.temNight}</span>-
<span class="temDay">${item.temDay}</span>
<span>℃</span>
</div>
<div class="wind">
<span class="windDirection">${item.windDirection}</span>
<span class="windPower">${item.windPower}</span>
</div>
</li>`
}).join('')
// console.log(dayForecastStr)
document.querySelector('.week-wrap').innerHTML = dayForecastStr
})
}
// 默认进入网页-就要获取天气数据(北京市城市编码:'110100')
getWeather('110100')
小结
做完这个项目会带来什么收货?
答案
- 可以做一个真正有意义的业务,查看城市的天气预报,测试自己封装的 myAxios 函数是否好用
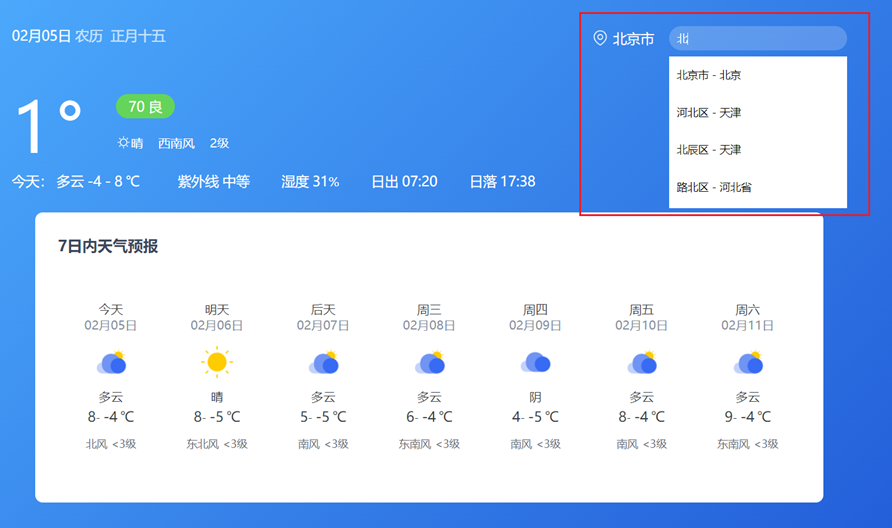
13.案例_天气预报-搜索城市列表
目标
根据关键字,展示匹配的城市列表
讲解
介绍本视频要完成的效果:搜索匹配关键字相关城市名字,展示城市列表即可
步骤
- 绑定 input 事件,获取关键字
- 获取展示城市列表数据
核心代码如下:
1
2
3
4
5
6
7
8
9
10
11
12
13
14
15
16
17
18
19
20
21
22
23/**
* 目标2:搜索城市列表
* 2.1 绑定input事件,获取关键字
* 2.2 获取展示城市列表数据
*/
// 2.1 绑定input事件,获取关键字
document.querySelector('.search-city').addEventListener('input', (e) => {
console.log(e.target.value)
// 2.2 获取展示城市列表数据
myAxios({
url: 'http://hmajax.itheima.net/api/weather/city',
params: {
city: e.target.value
}
}).then(result => {
console.log(result)
const liStr = result.data.map(item => {
return `<li class="city-item" data-code="${item.code}">${item.name}</li>`
}).join('')
console.log(liStr)
document.querySelector('.search-list').innerHTML = liStr
})
})
小结
监听输入框实时改变的事件是什么?
答案
- input事件
14.案例_天气预报-展示城市天气
目标
点击搜索框列表城市名字,切换对应城市天气数据
讲解
介绍本视频要完成的效果:点击城市列表名字,切换当前页面天气数据
步骤
- 检测搜索列表点击事件,获取城市 code 值
- 复用获取展示城市天气函数
核心代码如下:
1
2
3
4
5
6
7
8
9
10
11
12
13
14
15/**
* 目标3:切换城市天气
* 3.1 绑定城市点击事件,获取城市code值
* 3.2 调用获取并展示天气的函数
*/
// 3.1 绑定城市点击事件,获取城市code值
document.querySelector('.search-list').addEventListener('click', e => {
if (e.target.classList.contains('city-item')) {
// 只有点击城市li才会走这里
const cityCode = e.target.dataset.code
console.log(cityCode)
// 3.2 调用获取并展示天气的函数
getWeather(cityCode)
}
})
小结
这次我们获取城市天气,传递的是城市名字还是 code 值?
答案
- 看后端要求传递什么,就传什么即可
今日重点(必须会)
- 了解 AJAX 原理之 XMLHttpRequest(XHR)相关语法
- 了解 Promise 的作用和三种状态
- 了解 axios 内部运作的过程
- 完成案例-天气预报
今日作业(必完成)
参考作业文件夹作用
参考文档