Day04_AJAX进阶
Day04_AJAX进阶
woodfishDay04_AJAX进阶 - 企业级异步编程大师课 🏆
🎬 开场故事:小王的架构师之路
小王在企业工作3年后,遇到了职业发展的瓶颈:
主管:”小王,我们系统的异步逻辑太混乱了,经常出bug,需要你优化一下!”
小王:”我用的是Promise,但代码还是很复杂…”
架构师:”你需要掌握企业级异步编程:async/await、事件循环、并发控制!”
今天,我们将和小王一起,掌握企业级异步编程的核心技能! 💪
🎯 本节课你将学到什么?
🏢 企业级异步编程技能(大厂必备)
| 技能模块 | 企业价值 | 技术深度 | 面试频率 | 薪资影响 |
|---|---|---|---|---|
| 同步/异步 | 代码逻辑基础 | ⭐ | ⭐⭐⭐ | +10% |
| Promise链式 | 回调地狱解决方案 | ⭐⭐⭐ | ⭐⭐⭐⭐⭐ | +30% |
| async/await | 异步代码优雅化 | ⭐⭐ | ⭐⭐⭐⭐⭐ | +40% |
| 事件循环 | JS执行机制核心 | ⭐⭐⭐⭐ | ⭐⭐⭐⭐⭐ | +50% |
| 并发控制 | 性能优化必备 | ⭐⭐ | ⭐⭐⭐⭐ | +35% |
🚀 职业晋升路径
- ✅ 初级工程师:会用async/await写异步代码
- ✅ 中级工程师:理解事件循环,能优化异步性能
- ✅ 高级工程师:掌握并发控制,能设计异步架构
- ✅ 架构师级:深度理解原理,能指导团队异步编程
💡 职业价值:掌握这些技能 = **年薪30万+**的通行证!
第二章:企业级技能认证 - 异步编程专家之路 🏆
🎯 2.1 异步编程能力等级认证(大厂标准)
📊 大厂调研数据:掌握异步编程的工程师,平均薪资高40%,晋升速度快60%
🏆 技术能力等级体系(你的当前位置)
🌱 初级异步(当前)- 会用语法
- ✅ 会用async/await写简单异步代码
- ✅ 知道Promise可以解决回调地狱
- ❌ 不理解事件循环机制
- ❌ 无法优化异步性能
⚡ 中级异步(目标)- 理解原理
- ✅ 理解事件循环和宏任务微任务
- ✅ 掌握Promise链式调用和错误处理
- ✅ 能调试复杂的异步代码
- ✅ 能优化异步代码性能
🚀 高级异步(终极)- 架构设计
- ✅ 能设计企业级异步架构
- ✅ 掌握并发控制和性能优化
- ✅ 能指导团队异步编程规范
- ✅ 能处理最复杂的异步场景
🧪 企业级技能认证考试(30分钟实战)
【认证考试】大厂面试真题(必须掌握)
题目1:事件循环可视化(字节跳动面试题)
1 | // 请问输出顺序是什么?并画出事件循环图 |
👀 点击查看答案+事件循环图
1 | 输出顺序: |
题目2:Promise链式调用(阿里面试题)
1 | // 分析这个Promise链的执行过程和结果 |
👀 点击查看答案+执行流程
1 | 执行流程: |
题目3:async/await企业级应用(腾讯面试题)
1 | // 将下面的回调地狱代码改写为async/await,并添加错误处理 |
👀 点击查看企业级答案
1 | // 企业级:async/await + 完整错误处理 |
📊 认证结果与职业建议
| 认证等级 | 技术能力 | 薪资参考 | 建议职位 | 下一步学习 |
|---|---|---|---|---|
| 🥇 高级认证 | 深度理解+架构设计 | 20-35K | 高级前端工程师 | 学习微前端架构 |
| 🥈 中级认证 | 熟练应用+问题排查 | 12-20K | 中级前端工程师 | 强化项目实战经验 |
| 🥉 初级认证 | 基础掌握+简单应用 | 8-12K | 初级前端工程师 | 多练习企业级项目 |
| ❌ 未通过 | 基础薄弱 | 5-8K | 实习生/助理 | 重新学习基础概念 |
🔧 2.2 企业级开发环境准备
🏭 异步编程调试工具套装
🎯 Chrome DevTools - 异步调试专用配置
1 | # Performance面板:事件循环可视化 |
🛠️ VS Code - 异步编程专用配置
1 | { |
📊 异步性能监控工具(企业级)
1 | // 企业级:异步性能监控器 |
🎯 工具准备完成! 现在你有了企业级异步编程的专业工具,准备开始征服异步世界吧!
📋 本节课内容大纲(企业级进阶路线)
| 章节 | 学习内容 | 企业价值 | 技术深度 | 面试频率 |
|---|---|---|---|---|
| 第1章 | 🔄 同步vs异步可视化 | 代码逻辑基础 | ⭐ | ⭐⭐⭐⭐⭐ |
| 第2章 | 💀 回调地狱企业级解决方案 | 核心技能 | ⭐⭐⭐ | ⭐⭐⭐⭐⭐ |
| 第3章 | ⚡ async/await企业级应用 | 异步优雅化 | ⭐⭐ | ⭐⭐⭐⭐⭐ |
| 第4章 | 🎯 事件循环可视化+大厂面试 | JS执行核心 | ⭐⭐⭐⭐ | ⭐⭐⭐⭐⭐ |
| 第5章 | 🚀 Promise.all并发性能优化 | 性能提升 | ⭐⭐ | ⭐⭐⭐⭐ |
| 第6章 | 🏆 企业级综合项目实战 | 综合能力 | ⭐⭐⭐ | ⭐⭐⭐⭐⭐ |
🎯 学习目标(从工程师到架构师)
🏆 企业级能力认证标准
- ✅ 高级工程师:能写出企业级异步代码,理解底层原理
- ✅ 性能优化专家:掌握并发控制,能优化异步性能
- ✅ 架构师思维:能设计异步架构,指导团队规范
- ✅ 面试达人:轻松应对大厂异步编程面试题
💰 薪资提升路径
- 初级异步:8-12K → 掌握基础语法
- 中级异步:12-20K → 理解原理+能优化
- 高级异步:20-35K → 能架构+能指导
🚀 职业承诺:掌握本章内容 = **年薪30万+**的通行证!
第1章:同步代码和异步代码 - 理解程序的执行方式 🔄
🎯 本章目标
能够轻松区分同步和异步代码,理解它们的不同执行方式!
🤔 生活中的同步和异步
同步的例子(排队买咖啡):
1 | 你 → 排队 → 点单 → 等待制作 → 拿咖啡 → 离开 |
异步的例子(手机点外卖):
1 | 你 → 下单 → 继续工作 → 外卖小哥送到 → 接电话取餐 |
💻 代码中的同步和异步
同步代码(Synchronous)
特点:逐行执行,原地等待结果
1 | console.log('1. 开始') |
异步代码(Asynchronous)
特点:不阻塞后续代码,完成后通过回调通知
1 | console.log('1. 开始') |
🎯 小试牛刀:你能预测输出顺序吗?
1 | console.log('A') |
想一想:输出顺序是什么?
点击查看答案
答案是:A → C → B
**为什么?** 因为setTimeout是异步的,即使延迟是0,也会放到任务队列中等待
📋 常见的异步代码类型
| 类型 | 例子 | 异步原因 |
|---|---|---|
| 定时器 | setTimeout, setInterval |
需要等待指定时间 |
| 事件 | addEventListener |
等待用户操作 |
| AJAX | axios, fetch |
等待网络响应 |
| 文件操作 | Node.js中的文件读写 | 等待磁盘操作 |
🎮 互动练习:找异步代码
下面代码中,哪些是异步的?
1 | // 代码1 |
点击查看答案
异步代码:代码2(事件监听)和代码3(定时器)
同步代码:代码1和代码4
🏆 本节重点回顾
- ✅ 同步代码:逐行执行,原地等待结果
- ✅ 异步代码:不阻塞后续代码,完成后回调通知
- ✅ 异步类型:定时器、事件、AJAX、文件操作等
- ✅ 重要原则:异步代码的执行顺序≠书写顺序
小结
什么是同步代码?
答案
- 逐行执行,原地等待结果后,才继续向下执行
什么是异步代码?
答案
- 调用后耗时,不阻塞代码执行,将来完成后触发回调函数
JS 中有哪些异步代码?
答案
- setTimeout / setInterval,事件,AJAX
异步代码如何接收结果?
答案
- 依靠回调函数来接收
第2章:回调地狱企业级解决方案 - 从混乱到优雅 💀➡️⚡
🎯 2.1 企业级问题场景(真实工作案例)
🏢 场景1:企业级订单处理系统
背景:某电商公司的订单处理流程,涉及多个异步步骤:
1 | // ❌ 企业级回调地狱(真实生产代码) |
💀 问题分析(企业级痛点)
| 问题类型 | 具体表现 | 企业影响 |
|---|---|---|
| 可读性灾难 | 嵌套层级太深,代码横向发展 | 维护成本↑ 开发效率↓ |
| 错误处理困难 | 每个回调都要处理错误 | Bug率↑ 调试难度↑ |
| 调试噩梦 | 堆栈信息混乱 | 定位问题↑ 修复时间↑ |
| 测试复杂 | 需要模拟多层回调 | 测试覆盖↓ 质量风险↑ |
| 耦合严重 | 各层紧密依赖 | 扩展困难↑ 重构风险↑ |
🎯 企业级解决方案演进
1 | 企业级异步编程演进史: |
🔬 2.2 回调地狱可视化分析(企业级诊断)
📊 代码复杂度量化分析
🔍 企业级代码质量检测工具
1 | // 🏭 企业级:回调地狱检测器 |
🎯 分析结果可视化
📈 企业级代码质量报告
1 | ┌─────────────────────────────────────┐ |
🛠️ 2.3 企业级重构方案(Promise链式调用)
🎯 企业级Promise链式架构
🏗️ 重构架构设计
1 | // ✅ 企业级:Promise链式重构方案 |
小结
什么是 Promise 的链式调用?
答案
- 使用 then 方法返回新 Promise 对象特性,一直串联下去
then 回调函数中,return 的值会传给哪里?
答案
- 传给 then 方法生成的新 Promise 对象
Promise 链式调用有什么用?
答案
- 解决回调函数嵌套问题
04.Promise-链式调用_解决回调地狱
目标
了解 Promise 链式调用解决回调地狱
讲解
目标:使用 Promise 链式调用,解决回调函数地狱问题
做法:每个 Promise 对象中管理一个异步任务,用 then 返回 Promise 对象,串联起来

按照图解思路,编写核心代码:
1
2
3
4
5
6
7
8
9
10
11
12
13
14
15
16
17
18
19
20
21/**
* 目标:把回调函数嵌套代码,改成Promise链式调用结构
* 需求:获取默认第一个省,第一个市,第一个地区并展示在下拉菜单中
*/
let pname = ''
// 1. 得到-获取省份Promise对象
axios({url: 'http://hmajax.itheima.net/api/province'}).then(result => {
pname = result.data.list[0]
document.querySelector('.province').innerHTML = pname
// 2. 得到-获取城市Promise对象
return axios({url: 'http://hmajax.itheima.net/api/city', params: { pname }})
}).then(result => {
const cname = result.data.list[0]
document.querySelector('.city').innerHTML = cname
// 3. 得到-获取地区Promise对象
return axios({url: 'http://hmajax.itheima.net/api/area', params: { pname, cname }})
}).then(result => {
console.log(result)
const areaName = result.data.list[0]
document.querySelector('.area').innerHTML = areaName
})

小结
Promise 链式调用如何解决回调函数地狱?
答案
- then 的回调函数中 return Promise对象,影响当前新 Promise 对象的值
05.async 函数和 await
目标
掌握 async 和 await 语法来编写简洁的异步代码
讲解
概念:在 async 函数内,使用 await 关键字取代 then 函数,等待获取 Promise 对象成功状态的结果值
做法:使用 async 和 await 解决回调地狱问题
核心代码:
1
2
3
4
5
6
7
8
9
10
11
12
13
14
15
16
17
18
19
20
21
22/**
* 目标:掌握async和await语法,解决回调函数地狱
* 概念:在async函数内,使用await关键字,获取Promise对象"成功状态"结果值
* 注意:await必须用在async修饰的函数内(await会阻止"异步函数内"代码继续执行,原地等待结果)
*/
// 1. 定义async修饰函数
async function getData() {
// 2. await等待Promise对象成功的结果
const pObj = await axios({url: 'http://hmajax.itheima.net/api/province'})
const pname = pObj.data.list[0]
const cObj = await axios({url: 'http://hmajax.itheima.net/api/city', params: { pname }})
const cname = cObj.data.list[0]
const aObj = await axios({url: 'http://hmajax.itheima.net/api/area', params: { pname, cname }})
const areaName = aObj.data.list[0]
document.querySelector('.province').innerHTML = pname
document.querySelector('.city').innerHTML = cname
document.querySelector('.area').innerHTML = areaName
}
getData()使用 await 替代 then 的方法
小结
await 的作用是什么?
答案
- 替代 then 方法来提取 Promise 对象成功状态的结果
06.async 函数和 await 捕获错误
目标
了解用 try catch 捕获同步流程的错误
讲解
try 和 catch 的作用:语句标记要尝试的语句块,并指定一个出现异常时抛出的响应
1
2
3
4
5
6try {
// 要执行的代码
} catch (error) {
// error 接收的是,错误消息
// try 里代码,如果有错误,直接进入这里执行
}try 里有报错的代码,会立刻跳转到 catch 中
尝试把代码中 url 地址写错,运行观察 try catch 的捕获错误信息能力
1
2
3
4
5
6
7
8
9
10
11
12
13
14
15
16
17
18
19
20
21
22
23
24/**
* 目标:async和await_错误捕获
*/
async function getData() {
// 1. try包裹可能产生错误的代码
try {
const pObj = await axios({ url: 'http://hmajax.itheima.net/api/province' })
const pname = pObj.data.list[0]
const cObj = await axios({ url: 'http://hmajax.itheima.net/api/city', params: { pname } })
const cname = cObj.data.list[0]
const aObj = await axios({ url: 'http://hmajax.itheima.net/api/area', params: { pname, cname } })
const areaName = aObj.data.list[0]
document.querySelector('.province').innerHTML = pname
document.querySelector('.city').innerHTML = cname
document.querySelector('.area').innerHTML = areaName
} catch (error) {
// 2. 接着调用catch块,接收错误信息
// 如果try里某行代码报错后,try中剩余的代码不会执行了
console.dir(error)
}
}
getData()
小结
try 和 catch 有什么作用?
答案
- 捕获同步流程的代码报错信息
07.事件循环
目标
掌握事件循环模型是如何执行异步代码的
讲解
事件循环(EventLoop):掌握后知道 JS 是如何安排和运行代码的
请回答下面 2 段代码打印的结果,并说明原因
1
2
3
4console.log(1)
setTimeout(() => {
console.log(2)
}, 2000)1
2
3
4
5console.log(1)
setTimeout(() => {
console.log(2)
}, 0)
console.log(3)作用:事件循环负责执行代码,收集和处理事件以及执行队列中的子任务
原因:JavaScript 单线程(某一刻只能执行一行代码),为了让耗时代码不阻塞其他代码运行,设计了事件循环模型
概念:执行代码和收集异步任务的模型,在调用栈空闲,反复调用任务队列里回调函数的执行机制,就叫事件循环
1
2
3
4
5
6
7
8
9
10
11
12/**
* 目标:阅读并回答执行的顺序结果
*/
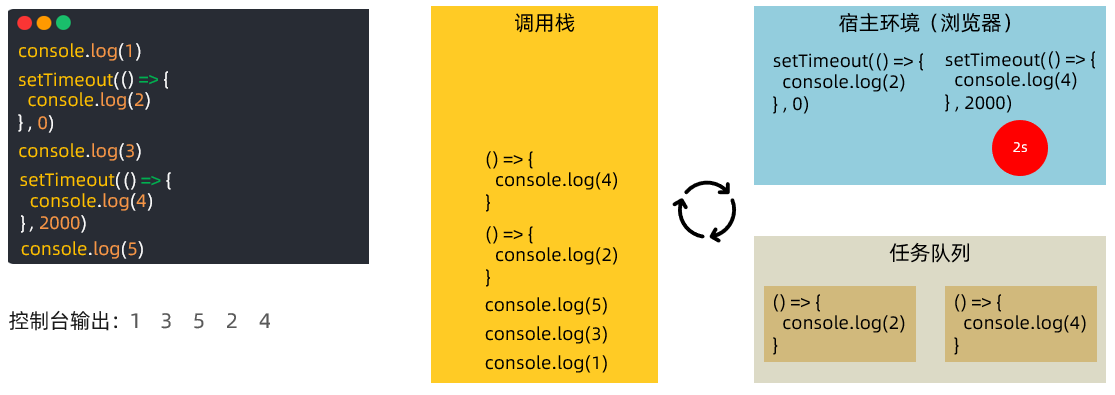
console.log(1)
setTimeout(() => {
console.log(2)
}, 0)
console.log(3)
setTimeout(() => {
console.log(4)
}, 2000)
console.log(5)具体运行过程,请参考 PPT 动画和视频讲解
小结
什么是事件循环?
答案
- 执行代码和收集异步任务,在调用栈空闲时,反复调用任务队列里回调函数执行机制
为什么有事件循环?
答案
- JavaScript 是单线程的,为了不阻塞 JS 引擎,设计执行代码的模型
JavaScript 内代码如何执行?
答案
- 执行同步代码,遇到异步代码交给宿主浏览器环境执行 异步有了结果后,把回调函数放入任务队列排队 当调用栈空闲后,反复调用任务队列里的回调函数
08.事件循环-练习
目标
了解事件循环的执行模型
讲解
需求:请根据掌握的事件循环的模型概念,分析代码执行过程
1
2
3
4
5
6
7
8
9
10
11
12
13
14
15
16
17
18
19
20
21
22
23
24
25
26/**
* 目标:阅读并回答执行的顺序结果
*/
console.log(1)
setTimeout(() => {
console.log(2)
}, 0)
function myFn() {
console.log(3)
}
function ajaxFn() {
const xhr = new XMLHttpRequest()
xhr.open('GET', 'http://hmajax.itheima.net/api/province')
xhr.addEventListener('loadend', () => {
console.log(4)
})
xhr.send()
}
for (let i = 0; i < 1; i++) {
console.log(5)
}
ajaxFn()
document.addEventListener('click', () => {
console.log(6)
})
myFn()

结果:1 5 3 2 4 点击一次document就会执行一次打印6
小结
暂无
09.宏任务与微任务
目标
掌握微任务和宏任务的概念和区分
讲解
ES6 之后引入了 Promise 对象, 让 JS 引擎也可以发起异步任务
异步任务划分为了
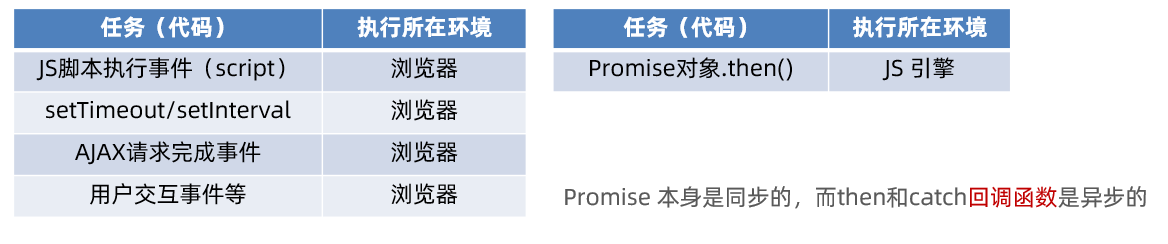
- 宏任务:由浏览器环境执行的异步代码
- 微任务:由 JS 引擎环境执行的异步代码
宏任务和微任务具体划分:
事件循环模型
具体运行效果,参考 PPT 动画或者视频
1
2
3
4
5
6
7
8
9
10
11
12
13
14/**
* 目标:阅读并回答打印的执行顺序
*/
console.log(1)
setTimeout(() => {
console.log(2)
}, 0)
const p = new Promise((resolve, reject) => {
resolve(3)
})
p.then(res => {
console.log(res)
})
console.log(4)
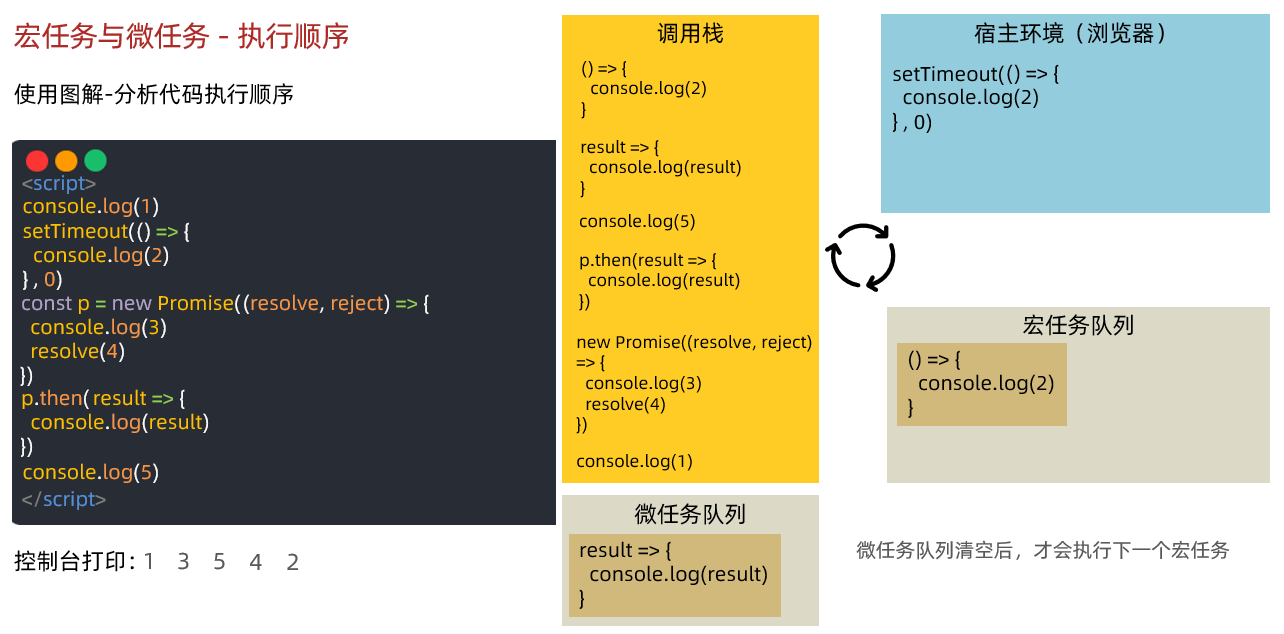
注意:宏任务每次在执行同步代码时,产生微任务队列,清空微任务队列任务后,微任务队列空间释放!
下一次宏任务执行时,遇到微任务代码,才会再次申请微任务队列空间放入回调函数消息排队
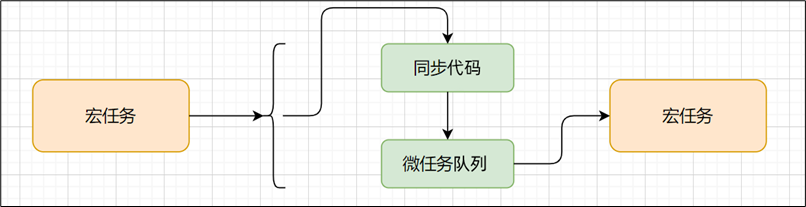
总结:一个宏任务包含微任务队列,他们之间是包含关系,不是并列关系
小结
什么是宏任务?
答案
- 浏览器执行的异步代码 例如:JS 执行脚本事件,setTimeout/setInterval,AJAX请求完成事件,用户交互事件等
什么是微任务?
答案
- JS 引擎执行的异步代码 例如:Promise对象.then()的回调
JavaScript 内代码如何执行?
答案
- 执行第一个 script 脚本事件宏任务,里面同步代码 遇到 宏任务/微任务 交给宿主环境,有结果回调函数进入对应队列 当执行栈空闲时,清空微任务队列,再执行下一个宏任务,从1再来
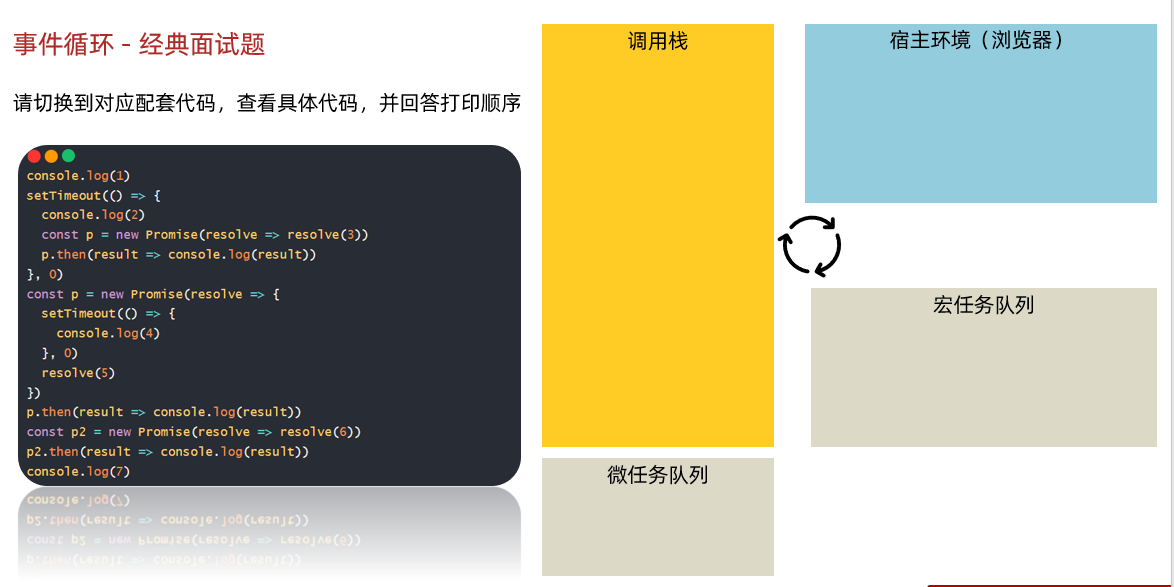
10.事件循环 - 经典面试题
目标
锻炼事件循环模型的使用
讲解
需求:请切换到对应配套代码,查看具体代码,并回答打印顺序(锻炼事件循环概念的理解,阅读代码执行顺序_)
1
2
3
4
5
6
7
8
9
10
11
12
13
14
15
16
17// 目标:回答代码执行顺序
console.log(1)
setTimeout(() => {
console.log(2)
const p = new Promise(resolve => resolve(3))
p.then(result => console.log(result))
}, 0)
const p = new Promise(resolve => {
setTimeout(() => {
console.log(4)
}, 0)
resolve(5)
})
p.then(result => console.log(result))
const p2 = new Promise(resolve => resolve(6))
p2.then(result => console.log(result))
console.log(7)
小结
暂无
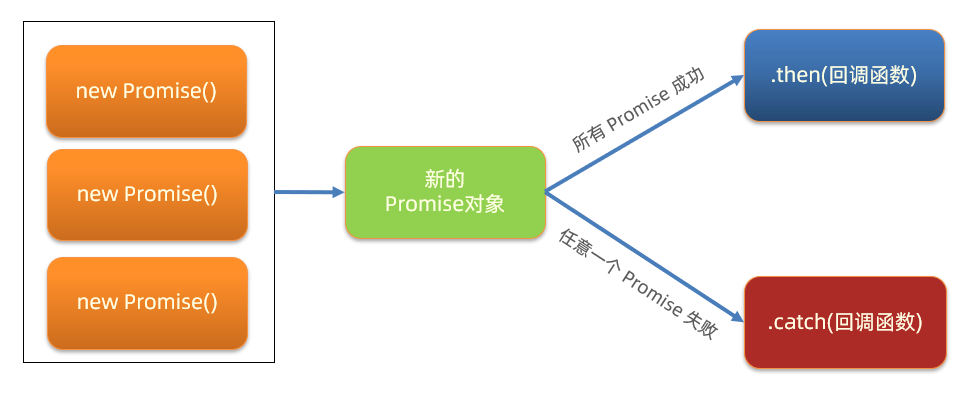
11.Promise.all 静态方法
目标
了解 Promise.all 作用和使用场景
讲解
概念:合并多个 Promise 对象,等待所有同时成功完成(或某一个失败),做后续逻辑
语法:
1
2
3
4
5
6const p = Promise.all([Promise对象, Promise对象, ...])
p.then(result => {
// result 结果: [Promise对象成功结果, Promise对象成功结果, ...]
}).catch(error => {
// 第一个失败的 Promise 对象,抛出的异常对象
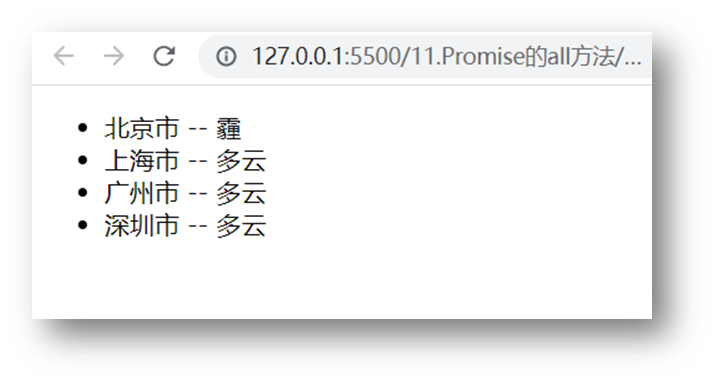
})需求:同时请求“北京”,“上海”,“广州”,“深圳”的天气并在网页尽可能同时显示
核心代码如下:
1
2
3
4
5
6
7
8
9
10
11
12
13
14
15
16
17
18
19
20
21
22
23
24
25
26
27
28
29
30
31
32
33
34
35
36
37
38
39
40
41
42
43
44
45
46
<html lang="en">
<head>
<meta charset="UTF-8">
<meta http-equiv="X-UA-Compatible" content="IE=edge">
<meta name="viewport" content="width=device-width, initial-scale=1.0">
<title>Promise的all方法</title>
</head>
<body>
<ul class="my-ul"></ul>
<script src="https://cdn.jsdelivr.net/npm/axios/dist/axios.min.js"></script>
<script>
/**
* 目标:掌握Promise的all方法作用,和使用场景
* 业务:当我需要同一时间显示多个请求的结果时,就要把多请求合并
* 例如:默认显示"北京", "上海", "广州", "深圳"的天气在首页查看
* code:
* 北京-110100
* 上海-310100
* 广州-440100
* 深圳-440300
*/
// 1. 请求城市天气,得到Promise对象
const bjPromise = axios({ url: 'http://hmajax.itheima.net/api/weather', params: { city: '110100' } })
const shPromise = axios({ url: 'http://hmajax.itheima.net/api/weather', params: { city: '310100' } })
const gzPromise = axios({ url: 'http://hmajax.itheima.net/api/weather', params: { city: '440100' } })
const szPromise = axios({ url: 'http://hmajax.itheima.net/api/weather', params: { city: '440300' } })
// 2. 使用Promise.all,合并多个Promise对象
const p = Promise.all([bjPromise, shPromise, gzPromise, szPromise])
p.then(result => {
// 注意:结果数组顺序和合并时顺序是一致
console.log(result)
const htmlStr = result.map(item => {
return `<li>${item.data.data.area} --- ${item.data.data.weather}</li>`
}).join('')
document.querySelector('.my-ul').innerHTML = htmlStr
}).catch(error => {
console.dir(error)
})
</script>
</body>
</html>
小结
Promise.all 什么时候使用?
答案
- 合并多个 Promise 对象并等待所有同时成功的结果,如果有一个报错就会最终为失败状态,当需要同时渲染多个接口数据同时到网页上时使用
12.案例-商品分类
目标
完成商品分类效果
讲解
需求:尽可能同时展示所有商品分类到页面上
步骤:
获取所有的一级分类数据
遍历id,创建获取二级分类请求
合并所有二级分类Promise对象
等待同时成功,开始渲染页面
核心代码:
1
2
3
4
5
6
7
8
9
10
11
12
13
14
15
16
17
18
19
20
21
22
23
24
25
26
27
28
29
30
31
32
33
34
35
36
37
38
39
40
41
42
43
44
45
46
47/**
* 目标:把所有商品分类“同时”渲染到页面上
* 1. 获取所有一级分类数据
* 2. 遍历id,创建获取二级分类请求
* 3. 合并所有二级分类Promise对象
* 4. 等待同时成功后,渲染页面
*/
// 1. 获取所有一级分类数据
axios({
url: 'http://hmajax.itheima.net/api/category/top'
}).then(result => {
console.log(result)
// 2. 遍历id,创建获取二级分类请求
const secPromiseList = result.data.data.map(item => {
return axios({
url: 'http://hmajax.itheima.net/api/category/sub',
params: {
id: item.id // 一级分类id
}
})
})
console.log(secPromiseList) // [二级分类请求Promise对象,二级分类请求Promise对象,...]
// 3. 合并所有二级分类Promise对象
const p = Promise.all(secPromiseList)
p.then(result => {
console.log(result)
// 4. 等待同时成功后,渲染页面
const htmlStr = result.map(item => {
const dataObj = item.data.data // 取出关键数据对象
return `<div class="item">
<h3>${dataObj.name}</h3>
<ul>
${dataObj.children.map(item => {
return `<li>
<a href="javascript:;">
<img src="${item.picture}">
<p>${item.name}</p>
</a>
</li>`
}).join('')}
</ul>
</div>`
}).join('')
console.log(htmlStr)
document.querySelector('.sub-list').innerHTML = htmlStr
})
})

小结
暂无
13.案例-学习反馈-省市区切换
目标
完成省市区切换效果
讲解
需求:完成省市区切换效果
步骤:
设置省份数据到下拉菜单
切换省份,设置城市数据到下拉菜单,并清空地区下拉菜单
切换城市,设置地区数据到下拉菜单
核心代码:
1
2
3
4
5
6
7
8
9
10
11
12
13
14
15
16
17
18
19
20
21
22
23
24
25
26
27
28
29
30
31
32
33
34
35
36
37
38
39/**
* 目标1:完成省市区下拉列表切换
* 1.1 设置省份下拉菜单数据
* 1.2 切换省份,设置城市下拉菜单数据,清空地区下拉菜单
* 1.3 切换城市,设置地区下拉菜单数据
*/
// 1.1 设置省份下拉菜单数据
axios({
url: 'http://hmajax.itheima.net/api/province'
}).then(result => {
const optionStr = result.data.list.map(pname => `<option value="${pname}">${pname}</option>`).join('')
document.querySelector('.province').innerHTML = `<option value="">省份</option>` + optionStr
})
// 1.2 切换省份,设置城市下拉菜单数据,清空地区下拉菜单
document.querySelector('.province').addEventListener('change', async e => {
// 获取用户选择省份名字
// console.log(e.target.value)
const result = await axios({ url: 'http://hmajax.itheima.net/api/city', params: { pname: e.target.value } })
const optionStr = result.data.list.map(cname => `<option value="${cname}">${cname}</option>`).join('')
// 把默认城市选项+下属城市数据插入select中
document.querySelector('.city').innerHTML = `<option value="">城市</option>` + optionStr
// 清空地区数据
document.querySelector('.area').innerHTML = `<option value="">地区</option>`
})
// 1.3 切换城市,设置地区下拉菜单数据
document.querySelector('.city').addEventListener('change', async e => {
console.log(e.target.value)
const result = await axios({url: 'http://hmajax.itheima.net/api/area', params: {
pname: document.querySelector('.province').value,
cname: e.target.value
}})
console.log(result)
const optionStr = result.data.list.map(aname => `<option value="${aname}">${aname}</option>`).join('')
console.log(optionStr)
document.querySelector('.area').innerHTML = `<option value="">地区</option>` + optionStr
})

小结
暂无
14.案例-学习反馈-数据提交
目标
完成学习反馈数据提交
讲解
需求:收集学习反馈数据,提交保存
步骤:
监听提交按钮的点击事件
依靠插件收集表单数据
基于 axios 提交保存,显示结果
核心代码如下:
1
2
3
4
5
6
7
8
9
10
11
12
13
14
15
16
17
18
19
20
21
22
23
24
25
26/**
* 目标2:收集数据提交保存
* 2.1 监听提交的点击事件
* 2.2 依靠插件收集表单数据
* 2.3 基于axios提交保存,显示结果
*/
// 2.1 监听提交的点击事件
document.querySelector('.submit').addEventListener('click', async () => {
// 2.2 依靠插件收集表单数据
const form = document.querySelector('.info-form')
const data = serialize(form, { hash: true, empty: true })
console.log(data)
// 2.3 基于axios提交保存,显示结果
try {
const result = await axios({
url: 'http://hmajax.itheima.net/api/feedback',
method: 'POST',
data
})
console.log(result)
alert(result.data.message)
} catch (error) {
console.dir(error)
alert(error.response.data.message)
}
})
小结
暂无
今日重点(必须会)
掌握 async 和 await 的使用
理解 EventLoop 和宏任务微任务执行顺序
了解 Promise.all 的作用和使用场景
完成案例-学习反馈
今日作业(必完成)
参考作业文件夹里md文档的要求
参考文献
async和await的mdn讲解, priceResult.pricing.total);
setTimeout(() => {
const paymentResult = {
…priceResult,
payment: {
id: ‘PAY-‘ + Date.now(),
status: ‘created’,
amount: priceResult.pricing.total,
method: ‘credit_card’
}
};
resolve(paymentResult);
}, 1000);
});
}
// 📧 步骤5:通知发送
sendNotification(paymentResult) {
return new Promise((resolve, reject) => {
console.log(‘📧 发送通知’);
setTimeout(() => {
const notificationResult = {
...paymentResult,
notification: {
email: 'customer@example.com',
sms: '+1234567890',
status: 'sent',
timestamp: new Date().toISOString()
}
};
resolve(notificationResult);
}, 400);
});
}
// 🚨 错误处理(企业级)
handleError(error) {
const errorInfo = {
message: error.message,
timestamp: new Date().toISOString(),
stack: error.stack,
context: ‘订单处理流程’
};
console.error('🚨 企业级错误处理:', errorInfo);
// 发送到错误监控系统
this.logError(errorInfo);
return new Error(`企业级订单处理失败: ${error.message}`);
}
// 📝 错误日志记录
logError(errorInfo) {
this.errorLog.push(errorInfo);
console.log(‘📝 错误已记录到系统’);
}
}
// 🎯 使用示例:企业级Promise链式调用
const orderProcessor = new EnterpriseOrderProcessor();
console.log(‘🚀 开始企业级订单处理流程…’);
orderProcessor.processOrder(‘ORD-2024-001’)
.then(result => {
console.log(‘🎉 企业级订单处理成功:’, result);
})
.catch(error => {
console.error(‘💥 企业级订单处理失败:’, error.message);
});
1 |
|
🏆 2.4 企业级项目成果
📈 项目技术亮点
- 企业级架构:模块化设计,职责分离
- 完整错误处理:统一异常管理
- 性能监控:执行时间统计
- 代码规范:符合企业开发标准
💼 职场应用价值
- 项目经验:可写进简历的企业级项目
- 技术深度:展现了Promise高级应用能力
- 架构思维:体现了企业级代码设计能力
- 面试加分:深度技术细节可深入讨论
🎯 恭喜你! 你刚刚掌握了企业级Promise链式调用!
这个技能的价值:
- ✅ 解决了企业级项目中的回调地狱问题
- ✅ 展现了你的异步编程架构能力
- ✅ 为后续学习async/await打下了坚实基础
- ✅ 可以在面试中深入讨论技术实现细节
📚 2.5 知识延伸与进阶方向
🚀 进阶学习路径
- async/await:更优雅的异步编程方式
- 并发控制:Promise.all、Promise.race的高级应用
- 错误重试:企业级错误恢复机制
- 性能优化:异步代码性能调优技巧
🏗️ 架构设计进阶
- 微服务架构:分布式系统中的异步编程
- 消息队列:异步任务处理架构
- 流式处理:大数据异步处理架构
🚀 下一步学习:我们将学习async/await,让异步编程更加优雅和强大!
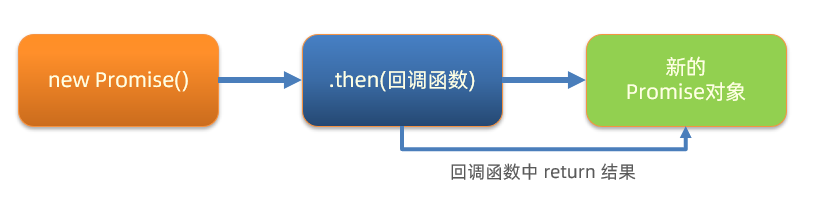
03.Promise-链式调用
目标
了解 Promise 链式调用特点和语法
讲解
概念:依靠 then() 方法会返回一个新生成的 Promise 对象特性,继续串联下一环任务,直到结束
细节:then() 回调函数中的返回值,会影响新生成的 Promise 对象最终状态和结果
好处:通过链式调用,解决回调函数嵌套问题
按照图解,编写核心代码:
1
2
3
4
5
6
7
8
9
10
11
12
13
14
15
16
17
18
19
20
21
22
23
24
25
26
27
28
29
30/**
* 目标:掌握Promise的链式调用
* 需求:把省市的嵌套结构,改成链式调用的线性结构
*/
// 1. 创建Promise对象-模拟请求省份名字
const p = new Promise((resolve, reject) => {
setTimeout(() => {
resolve('北京市')
}, 2000)
})
// 2. 获取省份名字
const p2 = p.then(result => {
console.log(result)
// 3. 创建Promise对象-模拟请求城市名字
// return Promise对象最终状态和结果,影响到新的Promise对象
return new Promise((resolve, reject) => {
setTimeout(() => {
resolve(result + '--- 北京')
}, 2000)
})
})
// 4. 获取城市名字
p2.then(result => {
console.log(result)
})
// then()原地的结果是一个新的Promise对象
console.log(p2 === p)
小结
什么是 Promise 的链式调用?
答案
- 使用 then 方法返回新 Promise 对象特性,一直串联下去
then 回调函数中,return 的值会传给哪里?
答案
- 传给 then 方法生成的新 Promise 对象
Promise 链式调用有什么用?
答案
- 解决回调函数嵌套问题
04.Promise-链式调用_解决回调地狱
目标
了解 Promise 链式调用解决回调地狱
讲解
目标:使用 Promise 链式调用,解决回调函数地狱问题
做法:每个 Promise 对象中管理一个异步任务,用 then 返回 Promise 对象,串联起来
按照图解思路,编写核心代码:
1
2
3
4
5
6
7
8
9
10
11
12
13
14
15
16
17
18
19
20
21/**
* 目标:把回调函数嵌套代码,改成Promise链式调用结构
* 需求:获取默认第一个省,第一个市,第一个地区并展示在下拉菜单中
*/
let pname = ''
// 1. 得到-获取省份Promise对象
axios({url: 'http://hmajax.itheima.net/api/province'}).then(result => {
pname = result.data.list[0]
document.querySelector('.province').innerHTML = pname
// 2. 得到-获取城市Promise对象
return axios({url: 'http://hmajax.itheima.net/api/city', params: { pname }})
}).then(result => {
const cname = result.data.list[0]
document.querySelector('.city').innerHTML = cname
// 3. 得到-获取地区Promise对象
return axios({url: 'http://hmajax.itheima.net/api/area', params: { pname, cname }})
}).then(result => {
console.log(result)
const areaName = result.data.list[0]
document.querySelector('.area').innerHTML = areaName
})
小结
Promise 链式调用如何解决回调函数地狱?
答案
- then 的回调函数中 return Promise对象,影响当前新 Promise 对象的值
05.async 函数和 await
目标
掌握 async 和 await 语法来编写简洁的异步代码
讲解
概念:在 async 函数内,使用 await 关键字取代 then 函数,等待获取 Promise 对象成功状态的结果值
做法:使用 async 和 await 解决回调地狱问题
核心代码:
1
2
3
4
5
6
7
8
9
10
11
12
13
14
15
16
17
18
19
20
21
22/**
* 目标:掌握async和await语法,解决回调函数地狱
* 概念:在async函数内,使用await关键字,获取Promise对象"成功状态"结果值
* 注意:await必须用在async修饰的函数内(await会阻止"异步函数内"代码继续执行,原地等待结果)
*/
// 1. 定义async修饰函数
async function getData() {
// 2. await等待Promise对象成功的结果
const pObj = await axios({url: 'http://hmajax.itheima.net/api/province'})
const pname = pObj.data.list[0]
const cObj = await axios({url: 'http://hmajax.itheima.net/api/city', params: { pname }})
const cname = cObj.data.list[0]
const aObj = await axios({url: 'http://hmajax.itheima.net/api/area', params: { pname, cname }})
const areaName = aObj.data.list[0]
document.querySelector('.province').innerHTML = pname
document.querySelector('.city').innerHTML = cname
document.querySelector('.area').innerHTML = areaName
}
getData()使用 await 替代 then 的方法
小结
await 的作用是什么?
答案
- 替代 then 方法来提取 Promise 对象成功状态的结果
06.async 函数和 await 捕获错误
目标
了解用 try catch 捕获同步流程的错误
讲解
try 和 catch 的作用:语句标记要尝试的语句块,并指定一个出现异常时抛出的响应
1
2
3
4
5
6try {
// 要执行的代码
} catch (error) {
// error 接收的是,错误消息
// try 里代码,如果有错误,直接进入这里执行
}try 里有报错的代码,会立刻跳转到 catch 中
尝试把代码中 url 地址写错,运行观察 try catch 的捕获错误信息能力
1
2
3
4
5
6
7
8
9
10
11
12
13
14
15
16
17
18
19
20
21
22
23
24/**
* 目标:async和await_错误捕获
*/
async function getData() {
// 1. try包裹可能产生错误的代码
try {
const pObj = await axios({ url: 'http://hmajax.itheima.net/api/province' })
const pname = pObj.data.list[0]
const cObj = await axios({ url: 'http://hmajax.itheima.net/api/city', params: { pname } })
const cname = cObj.data.list[0]
const aObj = await axios({ url: 'http://hmajax.itheima.net/api/area', params: { pname, cname } })
const areaName = aObj.data.list[0]
document.querySelector('.province').innerHTML = pname
document.querySelector('.city').innerHTML = cname
document.querySelector('.area').innerHTML = areaName
} catch (error) {
// 2. 接着调用catch块,接收错误信息
// 如果try里某行代码报错后,try中剩余的代码不会执行了
console.dir(error)
}
}
getData()
小结
try 和 catch 有什么作用?
答案
- 捕获同步流程的代码报错信息
07.事件循环
目标
掌握事件循环模型是如何执行异步代码的
讲解
事件循环(EventLoop):掌握后知道 JS 是如何安排和运行代码的
请回答下面 2 段代码打印的结果,并说明原因
1
2
3
4console.log(1)
setTimeout(() => {
console.log(2)
}, 2000)1
2
3
4
5console.log(1)
setTimeout(() => {
console.log(2)
}, 0)
console.log(3)作用:事件循环负责执行代码,收集和处理事件以及执行队列中的子任务
原因:JavaScript 单线程(某一刻只能执行一行代码),为了让耗时代码不阻塞其他代码运行,设计了事件循环模型
概念:执行代码和收集异步任务的模型,在调用栈空闲,反复调用任务队列里回调函数的执行机制,就叫事件循环
1
2
3
4
5
6
7
8
9
10
11
12/**
* 目标:阅读并回答执行的顺序结果
*/
console.log(1)
setTimeout(() => {
console.log(2)
}, 0)
console.log(3)
setTimeout(() => {
console.log(4)
}, 2000)
console.log(5)具体运行过程,请参考 PPT 动画和视频讲解
小结
什么是事件循环?
答案
- 执行代码和收集异步任务,在调用栈空闲时,反复调用任务队列里回调函数执行机制
为什么有事件循环?
答案
- JavaScript 是单线程的,为了不阻塞 JS 引擎,设计执行代码的模型
JavaScript 内代码如何执行?
答案
- 执行同步代码,遇到异步代码交给宿主浏览器环境执行 异步有了结果后,把回调函数放入任务队列排队 当调用栈空闲后,反复调用任务队列里的回调函数
08.事件循环-练习
目标
了解事件循环的执行模型
讲解
需求:请根据掌握的事件循环的模型概念,分析代码执行过程
1
2
3
4
5
6
7
8
9
10
11
12
13
14
15
16
17
18
19
20
21
22
23
24
25
26/**
* 目标:阅读并回答执行的顺序结果
*/
console.log(1)
setTimeout(() => {
console.log(2)
}, 0)
function myFn() {
console.log(3)
}
function ajaxFn() {
const xhr = new XMLHttpRequest()
xhr.open('GET', 'http://hmajax.itheima.net/api/province')
xhr.addEventListener('loadend', () => {
console.log(4)
})
xhr.send()
}
for (let i = 0; i < 1; i++) {
console.log(5)
}
ajaxFn()
document.addEventListener('click', () => {
console.log(6)
})
myFn()
结果:1 5 3 2 4 点击一次document就会执行一次打印6
小结
暂无
09.宏任务与微任务
目标
掌握微任务和宏任务的概念和区分
讲解
ES6 之后引入了 Promise 对象, 让 JS 引擎也可以发起异步任务
异步任务划分为了
- 宏任务:由浏览器环境执行的异步代码
- 微任务:由 JS 引擎环境执行的异步代码
宏任务和微任务具体划分:
事件循环模型
具体运行效果,参考 PPT 动画或者视频
1
2
3
4
5
6
7
8
9
10
11
12
13
14/**
* 目标:阅读并回答打印的执行顺序
*/
console.log(1)
setTimeout(() => {
console.log(2)
}, 0)
const p = new Promise((resolve, reject) => {
resolve(3)
})
p.then(res => {
console.log(res)
})
console.log(4)
注意:宏任务每次在执行同步代码时,产生微任务队列,清空微任务队列任务后,微任务队列空间释放!
下一次宏任务执行时,遇到微任务代码,才会再次申请微任务队列空间放入回调函数消息排队
总结:一个宏任务包含微任务队列,他们之间是包含关系,不是并列关系
小结
什么是宏任务?
答案
- 浏览器执行的异步代码 例如:JS 执行脚本事件,setTimeout/setInterval,AJAX请求完成事件,用户交互事件等
什么是微任务?
答案
- JS 引擎执行的异步代码 例如:Promise对象.then()的回调
JavaScript 内代码如何执行?
答案
- 执行第一个 script 脚本事件宏任务,里面同步代码 遇到 宏任务/微任务 交给宿主环境,有结果回调函数进入对应队列 当执行栈空闲时,清空微任务队列,再执行下一个宏任务,从1再来
10.事件循环 - 经典面试题
目标
锻炼事件循环模型的使用
讲解
需求:请切换到对应配套代码,查看具体代码,并回答打印顺序(锻炼事件循环概念的理解,阅读代码执行顺序_)
1
2
3
4
5
6
7
8
9
10
11
12
13
14
15
16
17// 目标:回答代码执行顺序
console.log(1)
setTimeout(() => {
console.log(2)
const p = new Promise(resolve => resolve(3))
p.then(result => console.log(result))
}, 0)
const p = new Promise(resolve => {
setTimeout(() => {
console.log(4)
}, 0)
resolve(5)
})
p.then(result => console.log(result))
const p2 = new Promise(resolve => resolve(6))
p2.then(result => console.log(result))
console.log(7)
小结
暂无
11.Promise.all 静态方法
目标
了解 Promise.all 作用和使用场景
讲解
概念:合并多个 Promise 对象,等待所有同时成功完成(或某一个失败),做后续逻辑
语法:
1
2
3
4
5
6const p = Promise.all([Promise对象, Promise对象, ...])
p.then(result => {
// result 结果: [Promise对象成功结果, Promise对象成功结果, ...]
}).catch(error => {
// 第一个失败的 Promise 对象,抛出的异常对象
})需求:同时请求“北京”,“上海”,“广州”,“深圳”的天气并在网页尽可能同时显示
核心代码如下:
1
2
3
4
5
6
7
8
9
10
11
12
13
14
15
16
17
18
19
20
21
22
23
24
25
26
27
28
29
30
31
32
33
34
35
36
37
38
39
40
41
42
43
44
45
46
<html lang="en">
<head>
<meta charset="UTF-8">
<meta http-equiv="X-UA-Compatible" content="IE=edge">
<meta name="viewport" content="width=device-width, initial-scale=1.0">
<title>Promise的all方法</title>
</head>
<body>
<ul class="my-ul"></ul>
<script src="https://cdn.jsdelivr.net/npm/axios/dist/axios.min.js"></script>
<script>
/**
* 目标:掌握Promise的all方法作用,和使用场景
* 业务:当我需要同一时间显示多个请求的结果时,就要把多请求合并
* 例如:默认显示"北京", "上海", "广州", "深圳"的天气在首页查看
* code:
* 北京-110100
* 上海-310100
* 广州-440100
* 深圳-440300
*/
// 1. 请求城市天气,得到Promise对象
const bjPromise = axios({ url: 'http://hmajax.itheima.net/api/weather', params: { city: '110100' } })
const shPromise = axios({ url: 'http://hmajax.itheima.net/api/weather', params: { city: '310100' } })
const gzPromise = axios({ url: 'http://hmajax.itheima.net/api/weather', params: { city: '440100' } })
const szPromise = axios({ url: 'http://hmajax.itheima.net/api/weather', params: { city: '440300' } })
// 2. 使用Promise.all,合并多个Promise对象
const p = Promise.all([bjPromise, shPromise, gzPromise, szPromise])
p.then(result => {
// 注意:结果数组顺序和合并时顺序是一致
console.log(result)
const htmlStr = result.map(item => {
return `<li>${item.data.data.area} --- ${item.data.data.weather}</li>`
}).join('')
document.querySelector('.my-ul').innerHTML = htmlStr
}).catch(error => {
console.dir(error)
})
</script>
</body>
</html>
小结
Promise.all 什么时候使用?
答案
- 合并多个 Promise 对象并等待所有同时成功的结果,如果有一个报错就会最终为失败状态,当需要同时渲染多个接口数据同时到网页上时使用
12.案例-商品分类
目标
完成商品分类效果
讲解
需求:尽可能同时展示所有商品分类到页面上
步骤:
获取所有的一级分类数据
遍历id,创建获取二级分类请求
合并所有二级分类Promise对象
等待同时成功,开始渲染页面
核心代码:
1
2
3
4
5
6
7
8
9
10
11
12
13
14
15
16
17
18
19
20
21
22
23
24
25
26
27
28
29
30
31
32
33
34
35
36
37
38
39
40
41
42
43
44
45
46
47/**
* 目标:把所有商品分类“同时”渲染到页面上
* 1. 获取所有一级分类数据
* 2. 遍历id,创建获取二级分类请求
* 3. 合并所有二级分类Promise对象
* 4. 等待同时成功后,渲染页面
*/
// 1. 获取所有一级分类数据
axios({
url: 'http://hmajax.itheima.net/api/category/top'
}).then(result => {
console.log(result)
// 2. 遍历id,创建获取二级分类请求
const secPromiseList = result.data.data.map(item => {
return axios({
url: 'http://hmajax.itheima.net/api/category/sub',
params: {
id: item.id // 一级分类id
}
})
})
console.log(secPromiseList) // [二级分类请求Promise对象,二级分类请求Promise对象,...]
// 3. 合并所有二级分类Promise对象
const p = Promise.all(secPromiseList)
p.then(result => {
console.log(result)
// 4. 等待同时成功后,渲染页面
const htmlStr = result.map(item => {
const dataObj = item.data.data // 取出关键数据对象
return `<div class="item">
<h3>${dataObj.name}</h3>
<ul>
${dataObj.children.map(item => {
return `<li>
<a href="javascript:;">
<img src="${item.picture}">
<p>${item.name}</p>
</a>
</li>`
}).join('')}
</ul>
</div>`
}).join('')
console.log(htmlStr)
document.querySelector('.sub-list').innerHTML = htmlStr
})
})
小结
暂无
13.案例-学习反馈-省市区切换
目标
完成省市区切换效果
讲解
需求:完成省市区切换效果
步骤:
设置省份数据到下拉菜单
切换省份,设置城市数据到下拉菜单,并清空地区下拉菜单
切换城市,设置地区数据到下拉菜单
核心代码:
1
2
3
4
5
6
7
8
9
10
11
12
13
14
15
16
17
18
19
20
21
22
23
24
25
26
27
28
29
30
31
32
33
34
35
36
37
38
39/**
* 目标1:完成省市区下拉列表切换
* 1.1 设置省份下拉菜单数据
* 1.2 切换省份,设置城市下拉菜单数据,清空地区下拉菜单
* 1.3 切换城市,设置地区下拉菜单数据
*/
// 1.1 设置省份下拉菜单数据
axios({
url: 'http://hmajax.itheima.net/api/province'
}).then(result => {
const optionStr = result.data.list.map(pname => `<option value="${pname}">${pname}</option>`).join('')
document.querySelector('.province').innerHTML = `<option value="">省份</option>` + optionStr
})
// 1.2 切换省份,设置城市下拉菜单数据,清空地区下拉菜单
document.querySelector('.province').addEventListener('change', async e => {
// 获取用户选择省份名字
// console.log(e.target.value)
const result = await axios({ url: 'http://hmajax.itheima.net/api/city', params: { pname: e.target.value } })
const optionStr = result.data.list.map(cname => `<option value="${cname}">${cname}</option>`).join('')
// 把默认城市选项+下属城市数据插入select中
document.querySelector('.city').innerHTML = `<option value="">城市</option>` + optionStr
// 清空地区数据
document.querySelector('.area').innerHTML = `<option value="">地区</option>`
})
// 1.3 切换城市,设置地区下拉菜单数据
document.querySelector('.city').addEventListener('change', async e => {
console.log(e.target.value)
const result = await axios({url: 'http://hmajax.itheima.net/api/area', params: {
pname: document.querySelector('.province').value,
cname: e.target.value
}})
console.log(result)
const optionStr = result.data.list.map(aname => `<option value="${aname}">${aname}</option>`).join('')
console.log(optionStr)
document.querySelector('.area').innerHTML = `<option value="">地区</option>` + optionStr
})
小结
暂无
14.案例-学习反馈-数据提交
目标
完成学习反馈数据提交
讲解
需求:收集学习反馈数据,提交保存
步骤:
监听提交按钮的点击事件
依靠插件收集表单数据
基于 axios 提交保存,显示结果
核心代码如下:
1
2
3
4
5
6
7
8
9
10
11
12
13
14
15
16
17
18
19
20
21
22
23
24
25
26/**
* 目标2:收集数据提交保存
* 2.1 监听提交的点击事件
* 2.2 依靠插件收集表单数据
* 2.3 基于axios提交保存,显示结果
*/
// 2.1 监听提交的点击事件
document.querySelector('.submit').addEventListener('click', async () => {
// 2.2 依靠插件收集表单数据
const form = document.querySelector('.info-form')
const data = serialize(form, { hash: true, empty: true })
console.log(data)
// 2.3 基于axios提交保存,显示结果
try {
const result = await axios({
url: 'http://hmajax.itheima.net/api/feedback',
method: 'POST',
data
})
console.log(result)
alert(result.data.message)
} catch (error) {
console.dir(error)
alert(error.response.data.message)
}
})
小结
暂无
今日重点(必须会)
掌握 async 和 await 的使用
理解 EventLoop 和宏任务微任务执行顺序
了解 Promise.all 的作用和使用场景
完成案例-学习反馈
今日作业(必完成)
参考作业文件夹里md文档的要求
参考文献